Tenant Admin Overview
The Admin menu in the tenant header opens configuration pages for your organisation. These settings control terminals, users, outbound mail, mail ingestion, EDI destinations, and audit visibility.
Most Admin menu items require tenant administrator permissions. Some items (for example EDI) require the Admin role specifically. If you do not see the Admin button or a menu item, contact your administrator.
Opening the Admin menu
- Sign in to your tenant ConPDS Checker URL (for example
https://your-tenant.conpds.com) - Click Admin in the header toolbar
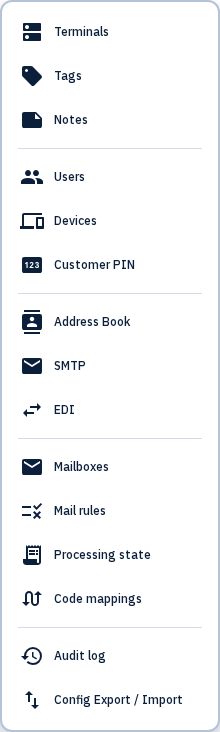
- Choose a page from the dropdown — the menu stays open until you pick an item or click outside
A badge on the Admin button shows how many device registration requests are waiting for approval. The same count appears on the Devices menu row.
Permission notes
| Access | Who |
|---|---|
| Admin menu button | Users with tenant-admin permissions (varies by page) |
| EDI menu item | Admin or SysAdmin role only |
| Most other Admin pages | Tenant administrators (your organisation’s admin group) |
If you see the Admin button but not EDI, you need the Admin role — contact your ConPDS administrator.
The menu is grouped into five areas (matching the product UI):
| Group | Pages |
|---|---|
| Workspace | Terminals, Tags, Notes |
| People & Access | Users, Devices, Customer PIN — includes Email setup instructions to send mobile app links and the tenant PIN to field staff |
| Communication | Address Book, SMTP, EDI, EDI Params |
| Mail Ingestion | Mailboxes, Mail rules, Mailbox ingest FAQ, Processing state, Code mappings |
| Activity & Maintenance | Insights, Audit log, Config Export / Import |
Admins can also reach Configuration Export / Import through toolbar shortcuts on the Mailboxes, EDI, and SMTP pages, pre-scoped to that page's sections.
How Admin relates to everyday use
- Terminals, tags, and notes shape what users see in the Gallery filters and case cards
- Users and devices control who can sign in and which mobile devices may upload
- Address Book, SMTP, and EDI power the Send to Destinations workflow
- Mail ingestion automatically creates cases from inbound email
- Audit log records who changed what for compliance review
For product background on inspection evidence and retention, see ConPDS Checker on conpds.com.
Related documentation
- Get started — First-day map for new administrators
- Getting started checklist — Ordered admin setup checklist
- Welcome — End-user navigation and getting started
- Send to Destinations — Using configured EDI and email destinations
- Account & Security — Personal profile and password (not tenant-wide settings)